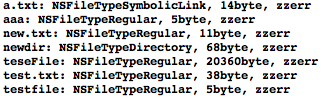
NSFileManager로 파일과 디텍토리를 복사/이동/삭제하는 간단한 예제 소스입니다. 각 단계는 enter를 로그창에 입력하면 진행되면 아래와 같은 순서로 작업을 합니다.

  1. test 디렉토리 생성
  2. test 디렉토리를 test2로 변경
  3. test.txt 파일을 test2 디렉토리 아래에 new_test.txt로 복사
  4. test2 디렉토리로 이동
  5. new_test.txt를 re_test.txt로 변경
  6. re_test.txt 삭제
  7. 상위 디렉토리로 이동
  8. test2 디렉토리 삭제
테스트 전에 실행파일이 있는 디렉토리에 test.txt란 파일을 vi나 편집기를 이용해 만들어 놓으셔야 합니다.

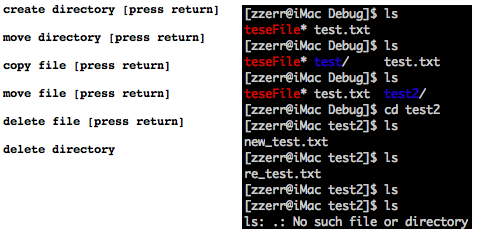
아래 이미지의 좌측은 Log창에서의 진행화면이며 우측은 터미널에서 진행화면입니다. 터미널에서 확인 후에 로그 창에서 [enter]를 입력하면서 한단계씩 진행합니다.

사용자 삽입 이미지

아래는 소스파일입니다. 별다른 내용이 없으므로 간단한 주석으로 설명을 대치하였습니다.

int main (int argc, const char * argv[]) {
    NSAutoreleasePool * pool = [[NSAutoreleasePool alloc] init];

    NSFileManager *FileManager;
    FileManager = [NSFileManager defaultManager];

    /** 현재 디렉토리에서 test란 디렉토리를 생성 */
    if ([FileManager createDirectoryAtPath:@"test" attributes:nil] == NO ) {
        NSLog(@"Fail to create directory");
        return 0;
    }
    NSLog(@"create directory [press return]");
    getchar();
   
    /** 현재 디렉토리에 test.txt 파일이 있는지 검사 */
    if ([FileManager fileExistsAtPath:@"test.txt"] == NO) {
        NSLog(@"test.txt file not exist");
        return 0;
    }
   
    /** 생성된 test 디렉토리를 test2로 변경 */
    [FileManager movePath: @"test" toPath: @"test2" handler:nil];
    NSLog(@"move directory [press return]");
    getchar();
   
    /** test.txt 파일을 test2 밑에 new_test.txt로 복사 */
    [FileManager copyPath: @"test.txt" toPath: @"./test2/new_test.txt"
        handler:nil];
    NSLog(@"copy file [press return]");
    getchar();
   
    /** 현재 디렉토리를 test2로 이동 후에 new_test.txt를 re_test.txt로 변경 */
    [FileManager changeCurrentDirectoryPath: @"test2"];
    [FileManager movePath: @"new_test.txt" toPath: @"re_test.txt"
        handler:nil];
    NSLog(@"move file [press return]");
    getchar();
   
    /** re_test.txt 파일 삭제 */
    [FileManager removeFileAtPath: @"re_test.txt" handler:nil];
    NSLog(@"delete file [press return]");
    getchar();
   
    /** 현재 디렉토리를 이전 디렉토리로 이동후에 test2 디렉토리 삭제 */
    [FileManager changeCurrentDirectoryPath: @".."];
    [FileManager removeFileAtPath: @"test2" handler:nil];
    NSLog(@"delete directory");
   
    [pool release];

    return 0;
}
AND

Cocoa 파운데이션의 NSFileManager 클래스를 이용하여 특정 패스내의 파일 목록을 검색하고 파일들의 속성을 알아내는 방법입니다. XCode 도움말에서 NSFileManager를 보시면 디렉토리와 파일 관리에 관한 다양한 정보를 확인하실 수 있습니다.

#import <Foundation/Foundation.h>

int main (int argc, const char * argv[]) {
    NSAutoreleasePool * pool = [[NSAutoreleasePool alloc] init];
   
    NSFileManager *fileManager;
    NSDirectoryEnumerator *directoryEnum;
    NSString* str;

    fileManager = [NSFileManager defaultManager];

    directoryEnum = [fileManager enumeratorAtPath:
        [fileManager currentDirectoryPath]];
   
    while ((str = [directoryEnum nextObject]) != nil) {
        NSDictionary *dic = [fileManager fileAttributesAtPath: str
                                                 traverseLink: NO];
       
        NSLog(@"%@: %@, %@byte, %@", str,
              [dic objectForKey: NSFileType],
              [dic objectForKey: NSFileSize],
              [dic objectForKey: NSFileOwnerAccountName]);
    }

    [pool release];

    return 0;
}

위의 소스를 빌드하고 실행하면 결과는 아래와 같습니다.

사용자 삽입 이미지

- (NSDirectoryEnumerator *)enumeratorAtPath:(NSString *)path
path에 지정된 디렉토리내의 모든 서브 디렉토리와 파일목록을 가져 옵니다.

- (NSDictionary *)fileAttributesAtPath:(NSString *)path traverseLink:(BOOL)flag
path에 지정된 파일 또는 디렉토리의 속성을 가지고 옵니다. flag를 YES로 지정하면 심볼릭 링크된 파일의 원본 파일의 정보를 가져오며, NO일 경우에는 링크된 파일의 정보를 가지고 옵니다.

속성은 NSDictionary의 objectForKey를 이용하여 각각의 속성을 가지고 올 수 있습니다. 각 속성에 대한 Key는 NSFileManager.h에 아래와 같이 정의되어 있습니다.

FOUNDATION_EXPORT NSString * const NSFileType;
FOUNDATION_EXPORT NSString * const NSFileTypeDirectory;
FOUNDATION_EXPORT NSString * const NSFileTypeRegular;
FOUNDATION_EXPORT NSString * const NSFileTypeSymbolicLink;
FOUNDATION_EXPORT NSString * const NSFileTypeSocket;
FOUNDATION_EXPORT NSString * const NSFileTypeCharacterSpecial;
FOUNDATION_EXPORT NSString * const NSFileTypeBlockSpecial;
FOUNDATION_EXPORT NSString * const NSFileTypeUnknown;
FOUNDATION_EXPORT NSString * const NSFileSize;
FOUNDATION_EXPORT NSString * const NSFileModificationDate;
FOUNDATION_EXPORT NSString * const NSFileReferenceCount;
FOUNDATION_EXPORT NSString * const NSFileDeviceIdentifier;
FOUNDATION_EXPORT NSString * const NSFileOwnerAccountName;
FOUNDATION_EXPORT NSString * const NSFileGroupOwnerAccountName;
FOUNDATION_EXPORT NSString * const NSFilePosixPermissions;
FOUNDATION_EXPORT NSString * const NSFileSystemNumber;
FOUNDATION_EXPORT NSString * const NSFileSystemFileNumber;
FOUNDATION_EXPORT NSString * const NSFileExtensionHidden;
FOUNDATION_EXPORT NSString * const NSFileHFSCreatorCode;
FOUNDATION_EXPORT NSString * const NSFileHFSTypeCode;
#if MAC_OS_X_VERSION_10_2 <= MAC_OS_X_VERSION_MAX_ALLOWED
FOUNDATION_EXPORT NSString * const NSFileImmutable;
FOUNDATION_EXPORT NSString * const NSFileAppendOnly;
FOUNDATION_EXPORT NSString * const NSFileCreationDate;
FOUNDATION_EXPORT NSString * const NSFileOwnerAccountID;
FOUNDATION_EXPORT NSString * const NSFileGroupOwnerAccountID;
#endif
#if MAC_OS_X_VERSION_10_4 <= MAC_OS_X_VERSION_MAX_ALLOWED
FOUNDATION_EXPORT NSString * const NSFileBusy;
#endif

AND

* NSFileManager : - (NSString *)currentDirectoryPath
    어플리케이션의 현재 디렉토리를 반환합니다.

* NSBundle  : - (NSString *)bundlePath
    어플리케이션의 번들 디렉토리를 반환합니다.

* NSString *NSHomeDirectory(void)
    현재 사용자의 홈 디렉토리를 반환합니다.

* NSString *NSHomeDirectoryForUser(NSString *userName)
    특정 계정(userName) 사용자의 홈디렉토리를 반환합니다.

* NSTemporaryDirectory()
    임시(temp)로 사용할 수 있는 디렉토리를 반환합니다.

* NSString *NSUserName(void)
    현재 사용자의 계정 이름을 반환합니다.

* NSString *NSFullUserName(void)
    현재 사용자의 전체 이름을 반환합니다.

#import <Foundation/Foundation.h>

int main (int argc, const char * argv[]) {
    NSAutoreleasePool * pool = [[NSAutoreleasePool alloc] init];

    // insert code here...
    NSLog(@"Cur Path: %@",
        [[NSFileManager defaultManager] currentDirectoryPath]);
    NSLog(@"Bundle Path: %@", [[NSBundle mainBundle] bundlePath]);
   
    NSLog(@"Home Path: %@", NSHomeDirectory());
    NSLog(@"User Home Path: %@",
        NSHomeDirectoryForUser(NSUserName()));
    NSLog(@"Temp Path: %@", NSTemporaryDirectory());
   
    NSLog(@"User Name: %@", NSFullUserName()); 
   
    [pool release];
    return 0;
}

실행 결과는 아래와 같습니다.
사용자 삽입 이미지
AND

유닉스 계열에서는 실제 파일뿐만 아니라 소켓, 파이프, 장치등 모든 것을 파일로 간주하고 관리합니다. (pipe에서의 사용예는 제 블로그의 pipe를 이용한 간단한 프로세스간의 통신에서 확인하실 수 있습니다.)

NSFileHandle은 코코아 파운데이션 프레임워크에 포함된 저수준의 File Descriptor와  그와 관련된 open, close, read, write등의 관련된 함수들의 래퍼 클래스입니다.

코코아에서는 겍체의 아카이브를 지원하고 xml등 데이터 타입에 따라 파일이나 URL로 부터 편리하게 읽고 쓸 수 있게 하는 클래스들이 있기 때문에, 일반적인 파일에 관련된 작업에서는 NSFileHandle을 사용하여 직접 파일을 제어할 경우는 그다지 많지 않습니다.

NSFileHandle은 데이터를 읽고 쓰는데 1바이트 바이너리로 데이터를 저장하는 NSData를 사용합니다. NSData는 많은 클래스들에서 용도에 맞게 변경하는 초기화 메소드를 제공하므로 필요에 따라 사용하시면 됩니다.

1. 파일에서 텍스트 읽기
기존에 존재하는 test.txt 텍스트 파일을 읽어 출력하는 간단한 예입니다.

* 파일 핸들러 얻기  
fileHandleForReadingAtPath로 읽기전용으로 파일을 오픈합니다. 실패시에는 nil을 반환합니다.

* 파일읽기
readDataToEndOfFile로 파일의 전체를 읽어 오고 readDataOfLength로 특정 크기만큼 읽어 올 수 있습니다.

* 파일닫기
사용을 완료하였을 경우에는 closeFile을 이용해서 열려 있는 파일을 닫습니다.

NSFileHandle *readFile;

readFile = [NSFileHandle fileHandleForReadingAtPath:@"test.txt"];
if(readFile == nil)
{
    NSLog(@"fail to read file");
    return 1;
}
   
NSData *data = [readFile readDataToEndOfFile];
NSString* text = [[NSString alloc] initWithData: data
                                                        encoding: NSUTF8StringEncoding];
NSLog(@"%@", text);

[text release];
[readFile closeFile];

2. 파일에 텍스트 쓰기
new.txt 텍스트 파일을 만들어 "new text..."란 텍스트를 입력하는 예입니다.

* 파일 생성
[[NSFileManager defaultManager] createFileAtPath:@"new.txt"
    contents: data attributes:nil];

두번째 인자인 contents에 data를 지정하여 data의 내용으로 파일이 생성됩니다. 빈 파일 생성시에는 nil로 설정합니다. 생성 후에 [writeFile writeData: data] 메소드를 이용하여 파일에 입력할 수 있습니다. NSFileManager에 관해서는 다음 포스팅에서 자세히 설명하겠습니다.

* NSFileHandle없이 파일 제어
[NSData dataWithContentsOfFile:@"new.txt"]

NSFileHandle을 거치지 않고 NSData에서 바로 파일을 읽어 올 수 있습니다. 반대로 저장도 가능합니다. 위에 언급한 것과 같이 클래스들이 파일에 관련된 메소드를 가지고 있습니다. NString도 NSData를 거치지 않고 아래와 같이 텍스트 파일에서 내용을 바로 읽어 올 수 있습니다.

NSString* readText =[NSString stringWithContentsOfFile:@"new.txt"
            encoding:NSUTF8StringEncoding error:NULL];

NSString* text = @"new text...";
NSFileHandle *writeFile;
NSData *data = [NSData dataWithBytes:[text cString]
    length:[text cStringLength]];   

[[NSFileManager defaultManager] createFileAtPath:@"new.txt"
    contents: data attributes:nil];

writeFile = [NSFileHandle fileHandleForWritingAtPath:@"new.txt"];
if(writeFile == nil)
{
    NSLog(@"fail to open file");
    return 1;
}
   
[writeFile closeFile];

/** 기록된 파일 확인 */
NSData* readData = [NSData dataWithContentsOfFile:@"new.txt"];
NSString* readText = [[NSString alloc] initWithData: readData
    encoding: NSUTF8StringEncoding];

NSLog(@"READ: %@", readText);

3. 기존 파일 변경
파일 포인터(offset) 이동
seekToFileOffset은 C에서 fseek, lseek와 같이 파일의 특정위치로 이동하게 해줍니다. 아래에 사용된 [writeFile seekToFileOffset: 2]는 파일 포인터를 두번째 바이트에 위치시키며 이후로 writeData로 기록할 때는 두번째 바이트 뒤로부터 파일에 쓰여집니다. 이와 유사하게 seekToEndOfFile는 파일의 마지막으로 파일포인터를 이동합니다.

아래는 위에서 생성한 new.txt 파일의 세번째 바이트 위치부터 test.txt 파일의 내용을 추가하는 예입니다.
NSFileHandle *readFile;
NSFileHandle *writeFile;

readFile = [NSFileHandle fileHandleForReadingAtPath:@"test.txt"];
if(readFile == nil)
{
    NSLog(@"fail to read file");
    return 1;
}

writeFile = [NSFileHandle fileHandleForWritingAtPath:@"new.txt"];
if(writeFile == nil)
{
    NSLog(@"fail to open file");
    return 1;
}

NSData *data = [readFile readDataToEndOfFile];

[writeFile seekToFileOffset: 2];
[writeFile writeData: data];

[readFile closeFile];
[writeFile closeFile];
AND