


PickerView, ImageView, TableView를 이용한 간단한 예제입니다. 좌측의 테이블뷰나 하단의 피커뷰에서 moveIn, push, reveal, fade 효과를 선택하면 우측의 이미지가 해당 효과로 다음 이미지와 변환되는 간단한 샘플입니다. 피커뷰의 2번째 컴퍼넌트에서는 효과가 진행되는 방향을 설정합니다. fade 효과에서는 이 방향이 적용되지 않습니다.
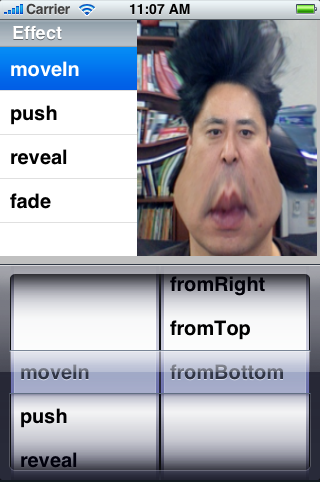 (사용한 샘플 이미지에 대해선 사과 드립니다)
이 샘플은 애플의 아이폰 DevCenter의 샘플코드중에서 UICatalog와 View Transitions 를 참조하였습니다.
1. 프로젝트 생성
Xcode의 메뉴에서 File / New Project를 클릭합니다. iPhone OS / Application을 선택하고 View-Based Application 템플릿을 선택하고 Choose..를 클릭합니다.

적당한 프로젝트명을 입력하고 Save를 클릭하여 프로젝트를 생성합니다. 여기서는 Control2로 생성하였습니다.
2. 소스코드 수정
Control2ViewController의 소스와 헤더 파일에 아래의 푸른색으로 되어 있는 부분을 입력합니다. 설명은 간단한 주석으로 대체하겠습니다.
1) Control2ViewController.h
2) Control2ViewController.m
3. 인터페이스 빌더
 이제 인터페이스 빌더에서 UI를 생성하고 속성들을 연결해 보겠습니다.
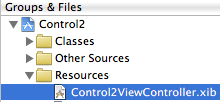
Groups & Files의 Resources 폴더에서 Control2ViewController.xib를 더블클릭하여 인터페이스 빌더를 오픈 합니다.
1) 컨트롤 배치
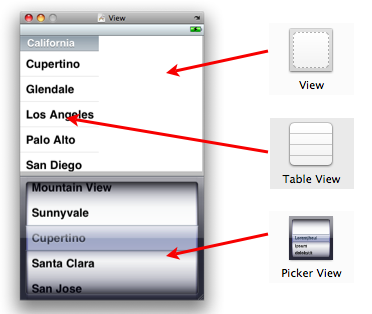
라이브러리 윈도우에서 View, TableView, PickerView를 각각 드래그 해서 아래와 같이
View에 배치합니다.
2) Outlet 연결
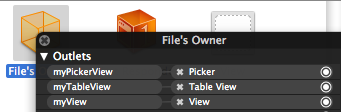
xib 윈도우에서 File's Owner를 우클릭 합니다. 여기서 File's Owner는 Control2ViewController 입니다. 각 Outlet들을 위에서 생성한 컨트롤들과 연결합니다. myPickerView를 PickerView와 myTableView를 TableView와 myView를 View로 연결합니다.
이제 작업이 완료되었습니다. 빌드를 하고 테스트를 하여 봅니다. 아래는 전체 프로젝트를 압축한 파일입니다.
이 샘플은 애플의 아이폰 DevCenter의 샘플코드중에서 UICatalog와 View Transitions 를 참조하였습니다.
1. 프로젝트 생성
Xcode의 메뉴에서 File / New Project를 클릭합니다. iPhone OS / Application을 선택하고 View-Based Application 템플릿을 선택하고 Choose..를 클릭합니다.
적당한 프로젝트명을 입력하고 Save를 클릭하여 프로젝트를 생성합니다. 여기서는 Control2로 생성하였습니다.
2. 소스코드 수정
Control2ViewController의 소스와 헤더 파일에 아래의 푸른색으로 되어 있는 부분을 입력합니다. 설명은 간단한 주석으로 대체하겠습니다.
1) Control2ViewController.h
#import <UIKit/UIKit.h>
@interface Control2ViewController : UIViewController {
IBOutlet UITableView *myTableView;
IBOutlet UIPickerView *myPickerView;
IBOutlet UIView *myView;
UIImageView *imageView1;
UIImageView *imageView2;
NSArray *effectArray;
NSArray *directionArray;
}
@end
@interface Control2ViewController : UIViewController {
IBOutlet UITableView *myTableView;
IBOutlet UIPickerView *myPickerView;
IBOutlet UIView *myView;
UIImageView *imageView1;
UIImageView *imageView2;
NSArray *effectArray;
NSArray *directionArray;
}
@end
2) Control2ViewController.m
#import "Control2ViewController.h"
#import <QuartzCore/QuartzCore.h>
@implementation Control2ViewController
static NSString *kCellIdentifier = @"MyIdentifier";
static NSString *kAnimationKey = @"transitionViewAnimation";
- (void)viewDidLoad {
[super viewDidLoad];
// 에니메이션 효과들을 배열로 저장
effectArray = [[NSArray arrayWithObjects:kCATransitionMoveIn, kCATransitionPush,
kCATransitionReveal, kCATransitionFade, nil] retain];
// 에니메이션 시 진행방향을 배열로 저장
directionArray = [[NSArray arrayWithObjects:kCATransitionFromLeft, kCATransitionFromRight,
kCATransitionFromTop, kCATransitionFromBottom, nil] retain];
// 이미지 뷰 생성
imageView1 = [[UIImageView alloc] initWithImage:[UIImage imageNamed:@"no1.png"]];
imageView2 = [[UIImageView alloc] initWithImage:[UIImage imageNamed:@"no2.png"]];
// 이미지 뷰 크기 설정
CGRect rect;
rect.origin = CGPointZero;
rect.size = [myView frame].size;
[imageView1 setFrame:rect];
[imageView2 setFrame:rect];
// 첫번째 이미지 뷰 추가
[myView addSubview:imageView1];
}
- (BOOL)shouldAutorotateToInterfaceOrientation:(UIInterfaceOrientation)interfaceOrientation {
// Return YES for supported orientations
return (interfaceOrientation == UIInterfaceOrientationPortrait);
}
- (void)didReceiveMemoryWarning {
[super didReceiveMemoryWarning]; // Releases the view if it doesn't have a superview
// Release anything that's not essential, such as cached data
}
- (void)dealloc {
[imageView1 release];
[imageView2 release];
[effectArray release];
[directionArray release];
[super dealloc];
}
#pragma mark Animation methods
/** 에니메이션 실행 */
- (void)transitionView:(NSUInteger)effect
{
UIView* newView;
UIView* oldView;
// 나올 뷰와 사라질 뷰를 설정
if ([imageView1 superview] == myView) {
newView = imageView2;
oldView = imageView1;
} else {
newView = imageView1;
oldView = imageView2;
}
// 이전 뷰를 삭제하고 새로운 뷰를 등록
[oldView removeFromSuperview];
if (newView && ([newView superview] == nil)) {
[myView insertSubview:newView atIndex:1];
}
// 에니메이션 효과와 방향을 설정
NSString *transition = [effectArray objectAtIndex:effect];
NSString *direction = [directionArray objectAtIndex:[myPickerView selectedRowInComponent:1]];
// 에니메이션
CATransition *animation = [CATransition animation];
// 변환효과 설정
if (transition == kCATransitionFade) {
[animation setType:kCATransitionFade];
} else {
[animation setType:transition];
[animation setSubtype:direction];
}
// 변환속도 설정
[animation setDuration:0.75];
[animation setTimingFunction:[CAMediaTimingFunction functionWithName:kCAMediaTimingFunctionEaseInEaseOut]];
[[myView layer] addAnimation:animation forKey:kAnimationKey];
}
#pragma mark TableView delegate/dataSource methods
/** 테이블뷰의 선택이 변경되었을 경우 */
- (void)tableView:(UITableView *)tableView didSelectRowAtIndexPath:(NSIndexPath *)indexPath
{
// PickerView의 효과 컴포넌트 선택 변경
[myPickerView selectRow:[indexPath row] inComponent:0 animated:TRUE];
// 에니메이션 실행
[self transitionView:[indexPath row]];
}
/** 테이블뷰 섹션 수 */
- (NSInteger)numberOfSectionsInTableView:(UITableView *)tableView
{
return 1;
}
/** 테이블뷰 row count */
- (NSInteger)tableView:(UITableView *)tableView numberOfRowsInSection:(NSInteger)section
{
return [effectArray count];
}
/** 테이블뷰 각 항목 타이틀 설정 */
- (UITableViewCell *)tableView:(UITableView *)aTableView cellForRowAtIndexPath:(NSIndexPath *)indexPath
{
UITableViewCell *cell = [aTableView dequeueReusableCellWithIdentifier:kCellIdentifier];
if (cell == nil)
{
cell = [[[UITableViewCell alloc] initWithFrame:CGRectZero reuseIdentifier:kCellIdentifier] autorelease];
}
cell.text = [effectArray objectAtIndex:indexPath.row];
return cell;
}
/** 색션 해더 타이틀 설정 */
- (NSString *)tableView:(UITableView *)aTableView titleForHeaderInSection:(NSInteger)section
{
return @"Effect";
}
#pragma mark PickerView delegate/dataSource methods
/** 피커뷰의 선택이 변경되었을 경우 */
- (void)pickerView:(UIPickerView *)pickerView didSelectRow:(NSInteger)row inComponent:(NSInteger)component
{
// componet가 0(첫번째 컴퍼넌트)일 경우에만 처리
if (component == 0) {
// 테이블뷰의 선택된 row 변경
[myTableView selectRowAtIndexPath:[NSIndexPath indexPathForRow:row inSection:component]
animated:NO
scrollPosition:UITableViewScrollPositionTop];
// 에니메니션 실행
[self transitionView:row];
}
}
/** 피커뷰의 컴퍼넌트 수 설정 - 2(효과, 방향) */
- (NSInteger)numberOfComponentsInPickerView:(UIPickerView *)pickerView
{
return 2;
}
/** 피커뷰의 각 컴퍼넌트의 row count */
- (NSInteger)pickerView:(UIPickerView *)pickerView numberOfRowsInComponent:(NSInteger)component
{
if (component == 0)
return [effectArray count];
else
return [directionArray count];
}
/** 피커뷰의 각 컴퍼넌트의 항목 타이틀 설정 */
- (NSString *)pickerView:(UIPickerView *)pickerView titleForRow:(NSInteger)row forComponent:(NSInteger)component
{
if (component == 0)
return [effectArray objectAtIndex:row];
else
return [directionArray objectAtIndex:row];
}
@end
3. 인터페이스 빌더
Groups & Files의 Resources 폴더에서 Control2ViewController.xib를 더블클릭하여 인터페이스 빌더를 오픈 합니다.
1) 컨트롤 배치
라이브러리 윈도우에서 View, TableView, PickerView를 각각 드래그 해서 아래와 같이
View에 배치합니다.
2) Outlet 연결
xib 윈도우에서 File's Owner를 우클릭 합니다. 여기서 File's Owner는 Control2ViewController 입니다. 각 Outlet들을 위에서 생성한 컨트롤들과 연결합니다. myPickerView를 PickerView와 myTableView를 TableView와 myView를 View로 연결합니다.
이제 작업이 완료되었습니다. 빌드를 하고 테스트를 하여 봅니다. 아래는 전체 프로젝트를 압축한 파일입니다.
 Control2.zip
'iOS' 카테고리의 다른 글
| iPhone 어플리케이션 개발을 위한 준비 - 1. 하드웨어 (9) | 2008.11.12 |
|---|---|
| 아이폰 개발자 프로그램 등록 완료 (22) | 2008.11.05 |
| iPhone 어플리케이션 아이콘 설정 (8) | 2008.09.11 |
| iPhone용 바이오리듬 어플리케이션 만들기 (2-2) (14) | 2008.09.10 |
| iPhone용 바이오리듬 어플리케이션 만들기 (2-1) (8) | 2008.09.09 |


