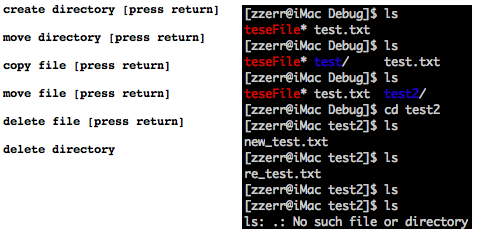
NSFileManager로 파일과 디텍토리를 복사/이동/삭제하는 간단한 예제 소스입니다. 각 단계는 enter를 로그창에 입력하면 진행되면 아래와 같은 순서로 작업을 합니다.
아래 이미지의 좌측은 Log창에서의 진행화면이며 우측은 터미널에서 진행화면입니다. 터미널에서 확인 후에 로그 창에서 [enter]를 입력하면서 한단계씩 진행합니다.

아래는 소스파일입니다. 별다른 내용이 없으므로 간단한 주석으로 설명을 대치하였습니다.
- test 디렉토리 생성
- test 디렉토리를 test2로 변경
- test.txt 파일을 test2 디렉토리 아래에 new_test.txt로 복사
- test2 디렉토리로 이동
- new_test.txt를 re_test.txt로 변경
- re_test.txt 삭제
- 상위 디렉토리로 이동
- test2 디렉토리 삭제
아래 이미지의 좌측은 Log창에서의 진행화면이며 우측은 터미널에서 진행화면입니다. 터미널에서 확인 후에 로그 창에서 [enter]를 입력하면서 한단계씩 진행합니다.

아래는 소스파일입니다. 별다른 내용이 없으므로 간단한 주석으로 설명을 대치하였습니다.
int main (int argc, const char * argv[]) {
NSAutoreleasePool * pool = [[NSAutoreleasePool alloc] init];
NSFileManager *FileManager;
FileManager = [NSFileManager defaultManager];
/** 현재 디렉토리에서 test란 디렉토리를 생성 */
if ([FileManager createDirectoryAtPath:@"test" attributes:nil] == NO ) {
NSLog(@"Fail to create directory");
return 0;
}
NSLog(@"create directory [press return]");
getchar();
/** 현재 디렉토리에 test.txt 파일이 있는지 검사 */
if ([FileManager fileExistsAtPath:@"test.txt"] == NO) {
NSLog(@"test.txt file not exist");
return 0;
}
/** 생성된 test 디렉토리를 test2로 변경 */
[FileManager movePath: @"test" toPath: @"test2" handler:nil];
NSLog(@"move directory [press return]");
getchar();
/** test.txt 파일을 test2 밑에 new_test.txt로 복사 */
[FileManager copyPath: @"test.txt" toPath: @"./test2/new_test.txt"
handler:nil];
NSLog(@"copy file [press return]");
getchar();
/** 현재 디렉토리를 test2로 이동 후에 new_test.txt를 re_test.txt로 변경 */
[FileManager changeCurrentDirectoryPath: @"test2"];
[FileManager movePath: @"new_test.txt" toPath: @"re_test.txt"
handler:nil];
NSLog(@"move file [press return]");
getchar();
/** re_test.txt 파일 삭제 */
[FileManager removeFileAtPath: @"re_test.txt" handler:nil];
NSLog(@"delete file [press return]");
getchar();
/** 현재 디렉토리를 이전 디렉토리로 이동후에 test2 디렉토리 삭제 */
[FileManager changeCurrentDirectoryPath: @".."];
[FileManager removeFileAtPath: @"test2" handler:nil];
NSLog(@"delete directory");
[pool release];
return 0;
}
'Xcode 2 > Foundation' 카테고리의 다른 글
| 파일 목록 및 속성 구하기 (0) | 2008.03.13 |
|---|---|
| 디렉토리, 사용자 정보 얻기 (0) | 2008.03.07 |
| NSFileHandle을 이용한 간단한 파일 입출력 (1) | 2008.03.03 |


